Hardware Tex Pert

  • Subscribe to our RSS feed.
  • Twitter
  • StumbleUpon
  • Reddit
  • Facebook
  • Digg
Showing posts with label Hardware Issues. Show all posts

Tuesday, 15 February 2011

Wireless Access Point

Posted on 15:00 by Unknown
Netgear Wireless Access Point


This powerful Netgear Prosafe 802.11G WG102 Wireless Access Point provides the industry standard access to home and corporate wired network resources, email and the Internet and includes support for MBSSID/VLANs, to enable more granular access to the network. Fully compatible with IEEE 802.11g, (2.4 GHz), it can also be set for dynamic 108 Mbps 802.11g.

With its robust security measures, simplified management and configuration, SNMP support, integrated IEEE 802.3af power over Ethernet (PoE), IntellilFi RF management technology and Wi-Fi certification, the WG102 brings standards-based enterprise-level functionality at a mid-market price.

The WG102 provides support for multiple Basic Service Set Identifiers (BSSID) and virtual LANs (VLANs). You can configure combination of VLANS and BSSIDS to provide stronger or less restrictive access to the network according to your requirements. For example visitors could be given wireless access for the Internet, but could be excluded from any access to the internal network.

WG102 with integrated IntelliFi radio frequency (RF) management technology, enables a wireless network to self-optimize by intelligently choosing channels and dynamically adjusting the power levels to ensure coverage and avoid interference. IntelliFi creates an additional level of privacy by providing self-organizing micro cells for enterprises. An additional level of security is added when used with NETGEAR’s IntelliFi-enabled client adapter, WAG511. In addition, the WG102 supports the ability to detect rogue access points and rogue stations.


Important Specifications:

Device type:
- Wireless access point

Wireless Network Standards:
- IEEE 802.11g
- IEEE 802.11b

Wireless Data Transfer Rates:
- Maximum 108 Mbps
    
Read More
Posted in Hardware Expert, Hardware Issues, Hardware Support, Netgear wireless Access point, PC Support, Technical Support, TechSupp247, Wireless Access Point, Wireless Devices | No comments

USB Wireless Adapter

Posted on 14:30 by Unknown
Linksys USB Wireless Adapter


Connect your USB-equipped desktop or notebook to a wireless network at incredible speeds with the Linksys WUSB54G USB Wireless Adapter. By incorporating two new, blazing fast technologies -- USB 2.0 and Wireless-G (802.11g) -- the Adapter delivers data rates up to 54Mbps (5 times as fast as 802.11b), without the trouble of opening up the case of your desktop computer.

To install, simply plug the Adapter into any available USB port. (It's compatible with both USB 1.1 and 2.0 ports, but 2.0 will yield the fastest speeds.) It gets its power through the USB connection, so no power cord is necessary. The included Setup Wizard walks you through configuring the Adapter to your wireless network settings, step by step. The Wireless-G USB Network Adapter is also compatible with the Wireless-B (802.11b) network standard, with data rates up to 11Mbps. And your wireless communications can be protected by industrial-strength Wi-Fi Protected Access (WPA) encryption, so your data stays safe.

Important Specifications:

Device type :
- USB wireless adapter

Interface:
- USB 1.1
- USB 2.0

Wireless Network Standards:
- IEEE 802.11g
- IEEE 802.11b

Wireless Data Transfer Rates:
- 54 Mbps

Security Features:
- Wireless Security Wi-Fi Protected Access (WPA, WPA2), WEP (64bits, 128bits)

Transmit power:
- 16+/-1 dBm (Typical) @ 11 Mbps CCK
- 14+/-1 dBm (Typical) @ 54 Mbps OFDM

Receiving Sensitivity:
- -80dBm @ 11 Mbps
- -65dBm @ 54 Mbps
  
Read More
Posted in Hardware Expert, Hardware Issues, Hardware Support, Linksys USB wireless Adapter, PC Support, Technical Support, TechSupp247, USB Wireless Devices, Wireless Devices | No comments

Monday, 14 February 2011

Wireless PCMCIA Card

Posted on 14:30 by Unknown

Linksys Wireless-N WPC300N Notebook Adapter


This WPC300N Wireless-N Notebook Adapter uses the very latest wireless networking technology, Wireless-N (draft 802.11n). By overlaying the signals of multiple radios, Wireless-N's "Multiple In, Multiple Out" (MIMO) technology multiplies the effective data rate. Unlike ordinary wireless networking technologies that are confused by signal reflections, MIMO actually uses these reflections to increase the range and reduce "dead spots" in the wireless coverage area. The robust signal travels farther, maintaining wireless connections up to 4 times farther than standard Wireless-G.

Once you're connected, you can keep in touch with your e-mail, access the Internet, and share files and other resources such as printers and network storage with other computers on the network, wherever you wander. At home, you can surf the web or use instant messaging to chat with friends while sitting out on the patio. You'll also be able to connect with any of the growing number of public hotspots springing up in coffee shops, airport lounges, hotels and convention centers. Your wireless connection is protected by industrial-strength 256-bit encryption. The included Setup Wizard will walk you through configuring the adapter to your network's settings, step by step.

With Wireless-N, the farther away you are, the more speed advantage you get. It works great with standard Wireless-G and -B equipment, but when both ends of the wireless link are Wireless-N, the throughput can be increased even more by using twice as much radio band, yielding speeds up to 12 times as fast as standard Wireless-G. Get your notebook connected to Wireless-N, Wireless-G, and Wireless-B networks with the Wireless-N Notebook Adapter from Linksys.

Important Specifications:

Device type :
- Wireless PCMCIA card for notebook

Interface:
- Notebook’s PC card slot

Wireless Network Standards:
- Draft IEEE 802.11n
- IEEE 802.11g
- IEEE 802.11b

Wireless Data Transfer Rates:
- 300 Mbps

Security Features:
- Wireless Security Wi-Fi Protected Access (WPA, WPA2), WEP (64bits, 128bits)

Transmit power:
- 802.11g: 12+/-1dBm (Typical)
- Wireless-N: 10+/-1dBm (Typical)

Receiving Sensitivity:
- 54 Mbps @ -70dBm (Typical)
- Wireless-N @ -70dBm (Typical)
Read More
Posted in Hardware Expert, Hardware Issues, Hardware Support, Linksys wireless-N Adapter, PC Support, Technical Support, TechSupp247, Wireless Devices, Wireless PCMCIA Card | No comments

Thursday, 10 February 2011

USB Wireless Adaptor

Posted on 11:30 by Unknown
Netgear WG111 USB Wireless Adaptor


NETGEAR WG111 (WG111US) USB wireless adapter delivers consistent wireless access to your desktop, notebook or public WiFi hotspot, ensuring no more dropped connections or dead spots. The WG111 is a simple and secure way to share a broadband Internet connection. And, installation is fast and easy with NETGEAR’s Smart Wizard installation software. The WG111 is Standard 802.11g compliant and backwards compatible with 802.11g or 802.11b wireless routers.
NETGEAR’s Wireless-G PC Card (WG511), PCI Adapter (WG311) and USB 2.0 Adapter (WG111) are optimized for use with the Wireless-G Router (WGR614).

Important Specifications:

Device type :
- USB wireless adapter

Interface:
- USB 2.0

Wireless Network Standards:
- IEEE 802.11g
- IEEE 802.11b

Wireless Data Transfer Rates:
- 54 Mbps

Security Features:
- Wireless Security Wi-Fi Protected Access (WPA, WPA2), WEP (40bits, 64bits, 128bits)
Read More
Posted in Hardware Issues, Hardware Support, hardwarwe texpert, Linksys WRT54G2 Wireless Router, Netgear Wireless adaptor, PC Support, Technical Support, TechSupp247, wireless adaptor | No comments

Monday, 7 February 2011

Disassembling a Computer

Posted on 07:30 by Unknown
5 Tips for Disassembling a Computer System


Disassembling a computer can be a painful task. If you're planning to slot in a new hardware component or want to look inside your PC, disassembly cannot be avoided.
Here are few tips for making the task pretty easy:

1. Cut Off The Power

This is important. The first thing to do when disassembling a PC is to disconnect your computer from all power sources.

2. Open the Case Slowly

Next, you want to open the computer case slowly. Some PCs slide off the side - and you may need to remove some screws before the cover can come off. Others open in different ways. You need to check your specific computer case.

3. Learn What is Inside the Case

Once that computer case comes off, you need to familiarize yourself with the internals of your PC. If you want, you can take photos. Usually, the things to look out for are you video card, hard drives, sound card, CPU, memory modules.

4. Disconnecting Adapter Cards

If you need to remove adapter cards, e.g. a PCI based sound card, you will need to take note of the screw at the top of the bracket. Remove that screw first, then you'll be able to disconnect the card.

5. Disconnecting Disk Drives

The other point to note is regarding disk drives. Disk drives (hard disks and floppy disks) usually have screws at the side to secure them in the PC's drive bays. Make sure you unscrew those carefully and hang on to the drive while doing it.

Its important to bear the above points in mind when opening up your PC, it will avoid any potential problems that may happen.
 
Read More
Posted in Disassembling a Computer, Hardware Issues, Hardware Support, Hardware Texpert, PC Case, PC Support, TechnicalSupport, TechSupp247 | No comments

Tuesday, 25 January 2011

Facts about Power supply connectors

Posted on 17:00 by Unknown


     computer power supply connectors can be pretty confusing for the newbie when setting up a new PC.

Get these connections wrong, and you'll have some funny LED lights or behaviors in your PC. In this article, we'll take a look at power supply connectors so you have an idea of what they are and how they function.

1. Best Source Of Information

First up, what's the best source of information to learn about computer power supply connectors? It's definitely the motherboard manual. Most motherboard manuals have specific instructions on how to hook up the computer power supply connectors to the motherboard. Review the manual carefully to make sense of those connectors.


2. Types Of Power Supply Connectors

What are the types of computer power supply connectors, you ask? Well, here they are:

    * Power to hard disk drives There are connectors which power the hard disk drives - you hook these up directly to the power suppy unit using the power cables supplied.


    * Power to the CPU The CPU is powered by a power supply connector hooked up to the motherboard. This is usually a small little connector you need to be familiar with your motherboard manual to ascertain what connector this is.


    * Power to graphics card Most of the heavy duty graphics cards in PCs have a separate line to power them. The power supply connector to graphics cards might come from the power supply unit, or the motherboard.


    * Power to computer beeper Notice how your computer 'beeps' when you first boot it up? That beep sound is powered by a computer power supply connector. You usually hook that connector between the motherboard and the power supply unit.


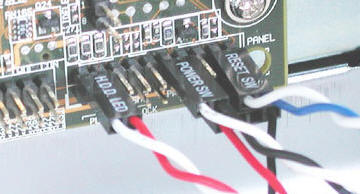
    * Power to LEDs and lights Your computer case will have LEDs and lights to indicate activity in the computer (e.g. hard disk drive activity). To power these lights, there are some small power supply connectors between the power supply unit and the motherboard as shown below


    * Power to floppy and optical drives Your floppy or optical drives will need to be powered by computer power supply connectors. These are usually hooked up between the drive and the computer power supply unit.


3. Be Careful With The Power Supply Connectors

Whenever you're dealing with the computer power supply, please ensure that you've grounded yourself properly. Very often, I hear of motherboards being short-circuited simply because the user forgot to ground himself or herself before meddling with the computer power supply connectors.
Read More
Posted in Hard Disk Support, Hardware Issues, Power Supply, Power supply connectors, Technical Support, TechSupp247 | No comments

Monday, 24 January 2011

Facts about Thermal grease

Posted on 05:46 by Unknown
        
         The application of thermal grease between a CPU and its cooler is an important step in installing a CPU.

I know this process intimidates many beginners, but it is really simple. Here are some important facts you need to know about applying thermal grease.

Thermal grease application has long been the domain of hardcore computer enthusiasts. But recently, as more people build their own computers, it is becoming more commonplace.Applying thermal grease is important for cooling a CPU


1. Why Use Thermal Grease?

Do you know why we need to use thermal grease when installing CPUs on a motherboard? Well, the reason is simple. Most CPUs come with a cooler. The contact between the CPU and the cooler is not perfect. Hence, thermal grease needs to be applied to close off the contact between the CPU and the cooler.


2. Found in Many Kinds Of Packages

Thermal grease is available in many different forms. It all depends on the brand and quality of grease you are looking for.

3. Remove Original Thermal Grease

One of the most important steps to remember when applying thermal grease between your CPU and its cooler is to remove the original thermal grease. You see, the original CPU packaging may already come with some thermal grease on them. Make sure you remove it before you apply any new thermal grease.


4. Common Mistakes

There are 2 common mistakes I can think of when applying thermal grease. One of them is to apply too much. Using too much thermal grease endangers your system because it could leak out to other components and causes short circuits on the motherboard.

The other common mistake concerns processors with seals on them. When you buy a CPU, please make sure that there is no seal on it. Otherwise, when applying thermal grease, you will have a lot of difficulty.


Read More
Posted in Hardware Issues, Hardware Support, Hardware Texpert, How to's, Technical Support, TechSupp247, Thermal Grease | No comments

Friday, 21 January 2011

Reasons for Hard Disk Drive Failure

Posted on 14:30 by Unknown


         If you've been using computers for any length of time, you should know that one of the most important parts of a PC is the hard drive.Now, it is critical that you understand this - the hard drive is one of the most delicate components in a PC and it can fail.


The worst thing is, when that happens, you could lose your favorite data as well. So it is important to do regular backups of your data to ensure no problems occure.

This article will look into some reasons why hard drives fail and what you can do to protect your stuff.


1. Why Hard Drives Fail

What are the primary causes of hard drive failures? Here's a list to ponder over:

    *      Age - hard drives will grow old and get bad sectors. It is a fact of computer life.
       
    *      Viruses are dangerous programs which can infect your hard drive and make them unreadable. You'd be wise to invest in a good anti-virus program like McAfee VirusScan.
       
    *      Physical damage. If you happen to drop a hard drive, the disk can be severely damaged.
       

2. How to Protect Your Data

Since hard drives can fail, what do you do? Well, the wisest thing to do is to regularly back up your data. I think that backup needs to be stored outside of the hard drive. Here are some backup ideas:

    *

      Using a second hard driveicon. You can buy a second hard drive, install it and use it as a quick backup tool. Of course, it will cost you money.
       
    *

      CD-R/CD-RW or DVD-R/DVD-RWicon. This is the method I'd use. I currently use a lot of DVDs for backing up my own data. A CD can hold up to 650 MB and a DVD up to 4.7 GB. That's plenty, plenty of room.
       
    *      Online Storage. Another thing to consider is online storage. It is also very convenient but you probably only want to choose this route if you have a fast, broadband connection.
       

3. What Data Do I Back Up?

It's important to create a standard list of items that you need to backup. Here is my list:

    *

      Pictures
    *

      Music
    *

      Video files
    *

      Important Documents (e.g. Word, PowerPoint, Excel)
    *

      Internet Explorer or Firefox bookmarks
    *

      Email addresses
    *

      Old email
Read More
Posted in Hard Disk Failure, Hard Disk Support, Hardware Issues, Hardware Support, TechnicalSupport, TechSupp247 | No comments

Thursday, 20 January 2011

Connecting 5.1 Speakers

Posted on 16:00 by Unknown

Have you ever wanted to experience surround sound from your PC speakers? If the answer is yes, then This article will show you how you can hook up 5.1 speakers to your current PC setup so you can enjoy computer sound from a whole new perspective.
             First, we need to understand the speaker system, then connect the cables and configure the proper options in your PC. So let's get started right away.


Connecting computer speakers to your PC is a simple task

1. Types of 6-Channel Speakers

If you've bought a set of speakers, you should know that there are two types of 6-channel surround speaker. These include analog and digital speakers. Now, analog speakers tend to be cheaper and can generally be installed on any given computer. In this article we will learn how to connect analog 6-channel systems.


2. Understand Your Speaker System First

Before you go about installing that speaker system, you will need to look at the unit and understand it first. Typically, speaker systems come with the speakers and a subwoofer. The speakers themselves are connected to each other using a connector, while the subwoofer has three connections - one to the AC power point, another cable to the volume control device and also subwoofer wires.


3. Connecting The Cables

If you check out the cables that came with the speaker system, you should be able to discern the ones which connect to the speakers and subwoofer. Make sure you connect them properly before connecting the power cable to the wall socket.


4. Over to the Computer

Now, we go over to the computer. What you need to do is to look at the back of your PC and see if there is a 'Speaker Out' port. This usually comes on the sound card (if you're using one) or from the motherboard (if you're using built-in audio). The best thing to do is to consult your sound card or motherboard manual to see where these outputs are.


5. Configure Your PC

Once you've connected the cables and speakers, the final thing to configure your PC to use 5.1 audio. Usually, if you have a sound card, there will be some kind of software driver that allows you to specify this.

Read More
Posted in Connecting 5.1 speakers, Hardware Issues, Hardware Support, How to's, Technical Support, TechSupp247 | No comments

Wednesday, 19 January 2011

Difference between PCI, AGP and PCI-Express cards

Posted on 16:30 by Unknown
Do you know the difference between PCI, AGP and PCI-Express?  This article is an attempt to clear up this confusion. PCI and PCI-Express are by themselves not a video interconnects, but AGP is a pure video interconnect. Understanding the difference between PCI, AGP and PCI-Express will go a long way in your understanding of computer technology in general. 


1. PCI

PCI stands for 'Peripheral Component Interconnect'. This is a connection within the system motherboard that has been used for the last ten years in the world of computing. There is a plethora of products available for PCI. These include sound cards, video cards, LAN cards and RAID controllers. The predecessor to PCI was ISA - which was one of the earlier connection types in the modern PC.


2. AGP

AGP stands for 'Accelerated Graphics Port'. It used to be that video cards were installed on the PCI bus. The problem was data transfer rate. The speed at which the PCI bus transfers data to and from the video card was too slow.

Hence, the AGP bus was launched to increase the data transfer rate of video cards. There are three specification of AGP - they are AGP 1.0, 2.0 and 3.0. The latest incantation of AGP is AGP 3.0. AGP data transfer is faster than PCI, but it is slower than PCI-Express.

The fact that AGP is a pure video interconnect (but not PCI and PCI-EXpress) is a key difference between PCI, AGP and PCI-Express.


3. PCI-Express

PCI-Express is the latest incantation of peripheral interconnections. It is destined to replace both PCI and AGP, especially in the world of video cards. More products are slated to be released that support PCI-Express. Most modern motherboards have PCI-Express built-in. The speed of PCI-Express is another key difference between PCI, AGP and PCI-Express.
Read More
Posted in AGP Support, Hardware Issues, Hardware Support, Hardware Texpert, PCI, PCI Express, Technical Support, TechSupp247 | No comments

Tuesday, 18 January 2011

Why Monitor goes Blank: Top 5 Reasons

Posted on 16:30 by Unknown
    
          
          Computer monitor problems can be very hard to troubleshoot - I mean, if your monitor goes blank, how do you check anything on your screen. So that's why it's important to have 2 monitors in the house. Usually, if I have my desktop PC's monitor going blank, I'll immediately hook up the video card to another monitor. If the screen remains blank, then it could point to a video card problem. If the new monitor displays an image, then it's probably the first monitor that has run into problems.


Reason 1: Wetness


The number one reason why computer monitors go blank is - wetness. Believe it or not, when your computer monitor is exposed to humid air, sometimes water can condense and accumulate in the monitor. This causes the monitor to malfunction and go blank. I've had this happen to my desktop PC at least three times before. What you need to do is to leave the monitor alone for some time and allow the water to evaporate. That usually solves the problem.


Reason 2: Faulty Graphics Card


The next reason why your computer monitor goes black is due to a faulty graphics card. The best way to detect this kind of problem is to connect up a new monitor to your PC, then check if you have a blank screen. If you continue to have a blank screen, then it's likely your video card is faulty.


Reason 3: Faulty RAM


This one is less obvious and less common, but it can happen. You might sometimes get bad RAM modules which prevent your PC from booting up even to the basic BIOS startup screen. To detect this kind of problem is more troublesome, you might need to remove those RAM modules and insert them into another computer.


Reason 4: Loose Connections


Another reason why your monitor goes blank is due to loose connections. The connection from the monitor to the mains is usually a culprit, as is the connection between the monitor and the video card. Check those connections before you declare your computer monitor as faulty.


Reason 5: A Short Circuit In The Motherboard


And the final reason why your computer monitor goes blank? It's possibly because of a short circuit in the motherboard. This is the most undesirable outcome of course, as you might have to replace your entire motherboard. However, it's possible that this can happen - so keep your fingers crossed and hope it doesn't happen to you.
Read More
Posted in Hardware Issues, Hardware Support, Monitor blank, Monitor Issues, Technical Support, TechSupp247 | No comments

Monday, 17 January 2011

How to power cycle your Computer

Posted on 16:30 by Unknown
   
            "power cycle" means, a computer equipment can be rather finicky at times. A device that was working fine ten minutes ago may begin acting strangely or may not be responding at all. Often the low-tech solution of simply turning off the device and turning it back on again will fix the problem. This is because information stored in the device's RAM may have gotten corrupted and caused the device to hang up or stall on a certain instruction. Power cycling the device erases the RAM and allows it to boot up with fresh information. Typically it is a good idea to wait 5 to 10 seconds before turning the device back on to make sure it has chance to fully reset. Of course, if you need to power cycle your computer, you should save any work you currently have open, since it will be erased from the RAM once the system is restarted.


Steps to be followed: 

1. Shut down your computer the proper way if possible, via your "Start" menu. If your system is completely locked up, however, then press your PC's power button and hold for 5 to 10 seconds, and your computer tower will turn off.

2. Unplug your computer – this is a very, very important step! Unplug your PC from its power supply. This will typically be the uppermost black cord at the back of your tower. For a notebook or laptop, remove the computer's battery and then un-plug its cord from the laptop. It is not enough to switch off your surge protector – you must unplug the cord from your laptop.

3. Wait for at least 30 seconds after all you computer is unplugged. This will allow enough time for any residual power to drain out of your different devices. You can speed up the process as you wait, by pressing the power button on your unplugged computer, which will help to drain all the power that is left over in your PC's motherboard.

4. Re-connect your computer  in this specific order: Plug in your computer. For a laptop, you'll put the battery back in and then plug it in. Press the power button to turn it back on. Allow it to fully boot up, which it will now boot up normally. You will now also be able to boot with no problem. You have power cycled your computer.


Read More
Posted in Hardware Issues, Hardware Support, Hardware Texpert, How to's, Power cycle, Technical Support, TechSupp247 | No comments
Older Posts Home
Subscribe to: Posts (Atom)

Popular Posts

  • How to Disable BIOS Settings
    How to Disable BIOS Settings BIOS is an acronym for Basic Input/Output System. It is the boot firmware program on a PC, and controls the c...
  • How to Clean all Disk's with the Diskpart Command
    Information This will show you how to use the clean command on a selected disk to delete all of it's M...
  • Difference Between Pentium Processor & Centrino
    Difference Between Pentium Processor & Centrino The Pentium Series Intel's line of Pentium processors includes more than just lapto...
  • VESA VGA Monitor
    What Is a VESA VGA Monitor? VESA is a worldwide monitoring body for a variety of computer graphics standards. They're best known for Fla...
  • How to Change the IRQ Settings in the BIOS
    Default motherboard BIOS settings usually do not need to be changed when the motherboard or computer is installed and will suffice for mo...
  • How to Wake Up a LAN
    The networking power management features on your computer allow it to save energy. The most common network power management feature used is ...
  • Check System Specification
    Computer users should familiarize themselves with the specifications of their machines. This information is valuable when it comes time to...
  • Repair an HP Laptop Power Jack
     The majority of problems with DC power jacks on HP laptop models stem directly from a crack forming between the power jack's positiv...
  • Difference Between AT & ATX Motherboards
     A bit of research into the specific features of your motherboard can help you decide what to buy, and it can protect your computer from dam...
  • Reset the Waste Ink on a Canon Printer
    The Canon ink counter tool estimates your remaining ink usage, and should be reset each time you replace your ink cartridge . This tells y...

Categories

  • Acer Aspire Factory Settings
  • Add PU to SLES
  • Advantages of Optical Mouse
  • AGP Support
  • Animal Trough In FarmVille
  • ANSI Standards
  • Asus
  • asus prime sense
  • AT and ATX Motherboards
  • Ati Radeon.
  • ATX Cabinet
  • Barcode Printer
  • Barcode reader
  • Barebone Kit
  • best i7 motherboard
  • Best seeds
  • BIOS Flash
  • BIOS IRQ Settings
  • Bios Power Management
  • BIOS Recommended settings
  • BIOS Update
  • BIOS Upgrade
  • Black screen
  • Bluetooth Compatibility
  • Bluetooth Device Support
  • Bluetooth Keyboard
  • BlueTrack technology Mouse
  • Blur Monitor Screen
  • BT Hub
  • Buying a Gaming Computer
  • Cable STB to PC
  • Card Reader
  • Cassettes to CD
  • Cat5e and Cat6e Cable
  • Cat5e Cable Types
  • CD Drive
  • Change BIOS IRQ Settings
  • Change Ink Waste Pad
  • Change Power LED
  • Change Trays in HP M3085
  • CircuitBoard Tools
  • citrix ipad
  • Clean Processor Fan
  • Clean Roller on Phaser 6120
  • Clean TrackPad
  • Clear Paper Jam on Inkjet Printer
  • CMOS battery
  • Common PC Hardware Problems
  • Compare Cartridg Toner
  • Computer Backup
  • Computer Components
  • Computer Hardware Monitoring Tools
  • Computer Power Supply
  • Computer Specification
  • Computer Storage Capacity
  • Computer Wont power on
  • Computer Workstation
  • Configure Xbox Wireless Network Adapter
  • Configuring a Mother Board
  • Configuring PC Gamepads
  • Connect CCTV to Computer
  • Connect FingerPrint Reader
  • Connect Inspiron to Lexmark
  • Connect Laptop to A/V Receiver
  • Connect Laptop to TV
  • Connect LCD to Computer
  • Connect PC to TV Wirelessly
  • Connect prjector to a computer wirelessly
  • Connect Two Computer to Act One System
  • Connect Two Computer to One Monitor
  • Connect Two Computers using USB
  • Connect Two Routers on One Home Network
  • Connect Xbox 360 to HDTV
  • Connecting 5.1 speakers
  • Convert Component Output to VGA
  • Convert Headphone to USB for VOIP
  • Convert LCD to DVI
  • Convert USB to Parallel
  • cool
  • Coxial Cable Types
  • CPU Components
  • CPU Stress Tests
  • CPU Temperature
  • Custom Personal Computer
  • D-link Wireless Router
  • Data Transfer from HDD to HDD
  • DDRAM
  • Default DVI Port
  • Delete Master Boot Record
  • Dell Recovery
  • Dell Support
  • DesignJet Printer Head Path
  • Desktop Support
  • Desktops
  • Difference Between DVD-R and DVD-RAM Discs
  • Difference between IDE and SATA Hard Drives
  • Difference between LCD and LED Monitors
  • Difference Between Notebook and Small Laptop
  • Difference between Pentium and Centrino
  • Difference Between Regedit and Regedit 32
  • Disable BIOS Settings
  • disable hybrid power
  • Disassembling a Computer
  • display self test
  • Dispose Printer Toner
  • Dual Core in smartphones
  • Dual Core Vs Quad Core
  • Dual Layer DVD
  • DVD Drive
  • DVD/CD ROM
  • DVI Port
  • Enable ATI Theater Mode
  • Enable IOMMU BIOS
  • Erase Password Protection on Hard Drive
  • Error 633
  • Expand Printer Memory
  • Extended Partition
  • External Hard Drive
  • external sound card
  • External USB
  • Facebook
  • Facebook Games
  • farmville
  • Farmville coins
  • Fiber Optic Cables Parts
  • Find a Lost File
  • FireWire
  • Fix EXE and CDD Files
  • Format Printer
  • Format Protected Disk
  • Game Console Gamepad Configuration
  • Games
  • GeForce Installing Problems
  • General Compnents of PDA
  • Graphics
  • Grapics Card Diagnostics
  • Hard Disk Failure
  • Hard Disk Jumper Settings
  • Hard Disk Partition
  • Hard Disk Support
  • Hard Disk Types
  • Hard drive
  • Hard Drive Enclosure
  • Hardware Components
  • Hardware Diagnostics Tools
  • Hardware Expert
  • Hardware Issues
  • Hardware Requirements for Firewall
  • Hardware Support
  • Hardware Testing Tools
  • Hardware Texpert
  • hardwarwe texpert
  • HDMI Motherboard
  • HDTV Tuner
  • HeatSink
  • Hibernate WakeUp
  • Hide Computer ID
  • Hide Computer Identity
  • High Speed Hard Drives
  • How to Disable Automatic Driver Installation in Windows 7
  • How to fix Keyboard not detecting by the computer
  • How to force eject a stuck DVD/CD drive
  • How to reduce noise in PC
  • How to Scan film Slides using a Flat Bed Scanner
  • How to troubleshoot no sound from computer speaker
  • How to Use a Digital Camera as a Webcam
  • How to's
  • HP 3380 Scanner
  • HP Dream Screen
  • HP Laptop Power Jack
  • HP Support
  • hybrid power
  • i7 motherboard
  • i7 processor
  • Identify Xeon Processor
  • IEEE Wiring Colors
  • iMac Resolution
  • Inkjet Hub
  • InkJet Hub Printable
  • Inkjet Multifunction Printers
  • Install AGP Card
  • Install blue-ray drive
  • Install Bluetooth Device
  • Install DSL Modem
  • install external card
  • Install Fan in Computer
  • Install Graphics Card
  • Install Internal Card Reader
  • Install Internal Modem
  • Install Laptop Skins
  • Install Network Card
  • Install Plotter Support
  • Install printer
  • Install SATA drivers
  • Install ScanDisk Cruzer
  • install sound card
  • Install TV Tuner Card
  • Install Video Card on Laptop
  • Install WebCam
  • Invertor on Laptop
  • ipad
  • ipad cloud computing
  • IPS Technology LCD
  • Itouch as a Removable Disk
  • Jaz Drive
  • keep
  • Kensington Lock
  • Keyboard Installation
  • KVM Switch
  • Laptop
  • laptop doesn't power on
  • Laptop Glossy Screen
  • Laptop Hardware Failures
  • Laptop IR
  • Laptop LCD Inverter
  • Laptop Life
  • Laptop NumLock
  • Laptop Overheating
  • laptop support
  • Laptops
  • Laser Printer vs Ink Jet Printer
  • Laser Virtual Keyboard
  • Lenovo Ideapad Laptop
  • Lenovo Support
  • Linksys E1000 wireless-N router
  • Linksys USB wireless Adapter
  • Linksys Wireless N Home Router
  • Linksys wireless PCI Adapter
  • Linksys wireless-N Adapter
  • Linksys WRT54G2 Wireless Router
  • Locate Lost Files
  • Logical Drives
  • Magic Color
  • Magnetic Storage
  • Maximize Computer Brightness
  • Membrane Keypads
  • Memory Card types
  • Memory Module
  • Missing page break
  • missing redo
  • missing undo
  • Mobile Phone
  • Monitor beeping
  • Monitor blank
  • Monitor Issues
  • monitor self test
  • More farmville coins
  • MotherBoard Jumper settings
  • Motherboard Support
  • Motherboard Support Chipset Support
  • Mouse Pointer Disappears
  • Netgear wireless Access point
  • Netgear Wireless adaptor
  • NETGEAR Wireless Dual Band Gigabit Router
  • Netgear Wireless USB Adapter
  • Network Card
  • Network Switch
  • new block editor
  • New Seagate Harddisk
  • No display
  • Notebook Mouse
  • Notebook Screens
  • Nvidia Card Support
  • Nvidia Drivers
  • Nvidia GF114
  • Nvidia graphics card
  • NVRAM
  • Online games
  • onlive
  • Open Explorer.exe
  • Optical Drive
  • Optical Storage
  • Optical Storage More Durable than Magnetic Storage
  • Output devices
  • Parallel Computers
  • Parts of the System Case
  • PC Card to USB
  • PC Case
  • PC Speakers for Home Stereo
  • PC Support
  • PCI
  • PCI Adapter
  • PCI Express
  • PCMCIA Card
  • PDA Backup
  • PDA Soft Reset
  • PDA Warm Reset
  • Phaser Printer
  • Plasma Screen
  • Play Music on another computer speakers
  • Plotter Support
  • Power cycle
  • Power Supply
  • Power supply connectors
  • Power Switch
  • Primary Partition
  • Print a Color Image
  • Print Black and White on Canon MX850
  • Printer
  • Printer Color Alignment Issues
  • printer support
  • printers
  • Processor Fan
  • Processor Support
  • PS3 Controller
  • Rack Mount Power Supply
  • RAM
  • RAM Types
  • RAM Upgrade
  • Record Stereo to Computer
  • Remote Reader
  • Remove Ribbon Cable
  • Repair Maxtor Bad Sector
  • Repair Raw Drive
  • Replace CMOS battery
  • Replace HDMI with Ethernet Cables
  • Replace Ink in Canon MP970
  • Replace Laptop Battery
  • Replace Laptop DVD/CD ROM
  • Replace Laptop Hard Drive
  • Replace Laptop Keyboard
  • Replace Laptop RAM
  • Replace LED Bulb in Laptop
  • Reset BIOS Password
  • Reset Dell Axim Password
  • Reset Int Settings
  • Reset Laptop
  • Reset Low Ink Messages
  • Reset PDA
  • Reset Waste Ink on Canon Printer
  • Restore Fuction on HP Laptop
  • Return Toshiba to Orginal Settings
  • Safely Remove Hardware
  • Sandy Bridge Processor
  • Sapphire Radeon HD 6870 Vapor
  • Sata Drivers
  • Save Laptop Battery
  • Scan Documents
  • Scanner Support
  • SCSI to USB Adapter
  • SDRAM
  • Seagate Barracuda
  • Second Generation Intel Processors
  • Secondary IP Addresses With HSRP
  • Setup Computer to a Projector
  • setup dual monitors
  • Smart Switch
  • Smartphones
  • SMPS
  • Software to test Computer Hardware
  • Solid State drive
  • Sony Vaio USB
  • Specific Hardware not Working
  • spyware
  • Stream TV on VLC
  • Switch PC Hardware
  • Synaptics Pointing Deive
  • Sync Mobile with PC
  • System Crashing or Rebooting
  • Tape Drive Installation
  • Technical Support
  • TechnicalSupport
  • TechSupp247
  • The best online game
  • Thermal Grease
  • Thermal Printer
  • Three Port IEEE
  • Tools required while working on PC
  • Top 5 AMD Motherboards
  • Top 5 Video Crads
  • Touchpad
  • Types of Computer Mice
  • Types of DVD Drives
  • Types of Expansion Slots
  • Types of hard drives
  • Types of Input Devices
  • Types of Memory Cards
  • Types of Processors
  • UEFI Architecture
  • Unable to detect SATA hard disk
  • Unable to Scan from Konica Minolta
  • Unlock OSD
  • Upgrade Computer
  • Upgrade USB Drive
  • Upgrade WEP to WPA
  • USB 3.0
  • USB Adapter Types
  • USB Cables
  • USB Host Controller
  • USB Hub Specification
  • USB Not Working
  • USB Port
  • USB Portable Disk drive
  • USB Support
  • USB to PS2 Cable
  • USB Wireless Devices
  • Uses of Desktop Computers
  • VESA Bracket Mounts
  • Vesa Specification
  • Vesa VGA Connector
  • VESA VGA Monitor
  • VESA Wall Mount
  • VGA Shared Memory
  • Video card
  • Video Cards
  • Virtual System
  • Virus Removal Support
  • Virus Support
  • Visual Display Unit
  • Wakeup LAN
  • Ways to Keep Your PC Cool
  • Ways to Save Printer Ink
  • Web Monitoring
  • Webcam as Security Camera
  • Wet Laptop
  • windows 7 ipad. windows 7 on ipad
  • Windows 7 Optimization
  • windows 7 support
  • Windows XP Optimization
  • Wireless Access Point
  • wireless adaptor
  • Wireless Devices
  • Wireless Home Theater
  • Wireless Mouse Battery
  • Wireless Mouse Support
  • Wireless Network Types
  • Wireless PCMCIA Card
  • Wireless Printer Adapter
  • Wireless Router
  • Wireless Wep Password
  • Xeon Processors
  • Xerox Phaser 6360
  • Zynga
  • Zynga games

Blog Archive

  • ▼  2011 (313)
    • ▼  July (1)
      • Keep your laptop cool
    • ►  June (27)
    • ►  May (11)
    • ►  April (33)
    • ►  March (97)
    • ►  February (58)
    • ►  January (86)
  • ►  2010 (63)
    • ►  December (34)
    • ►  November (11)
    • ►  October (18)
Powered by Blogger.

About Me

Unknown
View my complete profile